

At Fourneau we don’t eat to live, we live to eat. That means always making room for good food. It’s in that spirit that we’re happy to present Fourneau Factory Lunch, recipes from the factory floor. Well, not literally from the floor … too many metal shavings to brush off.
Each lunch is an entire meal containing a few recipes which of course can be cherry picked or mixed and matched. But if you're ever looking for inspiration for a simple meal–lunch or dinner, inside a factory or outside of one–our factory lunches are a safe bet.
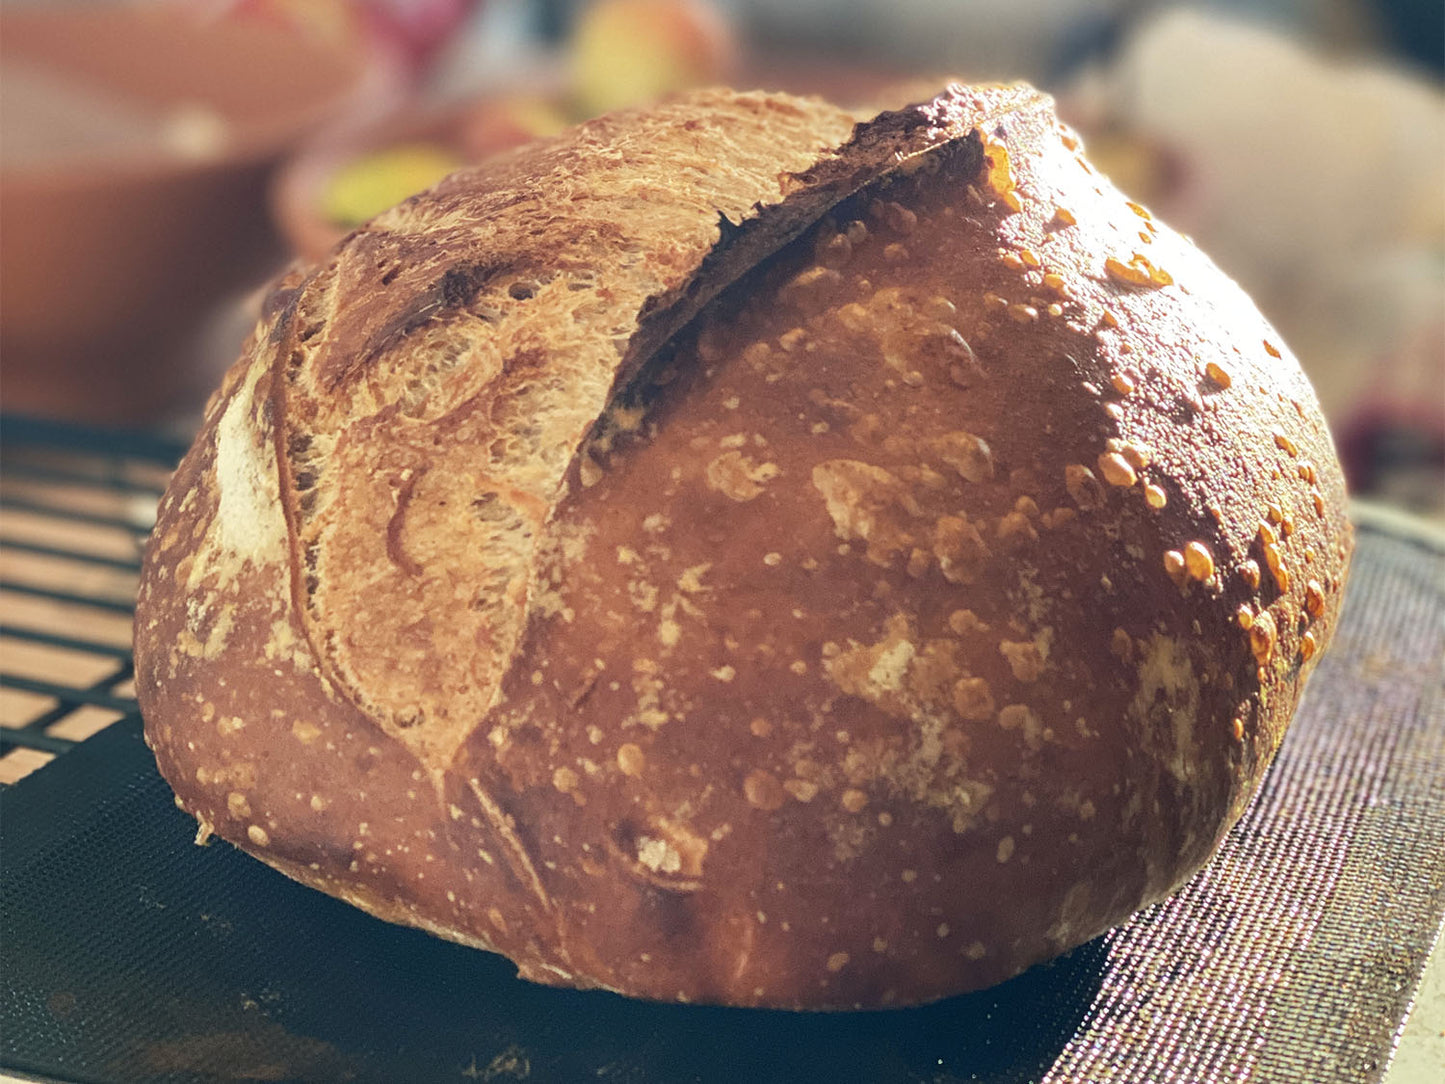
The bread below is a simple sourdough that is ready for riffing. The timing is layed out so that your only working time is before bed, at coffee time, and at lunch time. Time ranges are suggested and you can follow the general fermentation rule, hotter is faster, cooler is slower. So if your home temperature is below 72 F err toward the longer fermentation times. If it is warmer, lean toward the shorter timeframes.
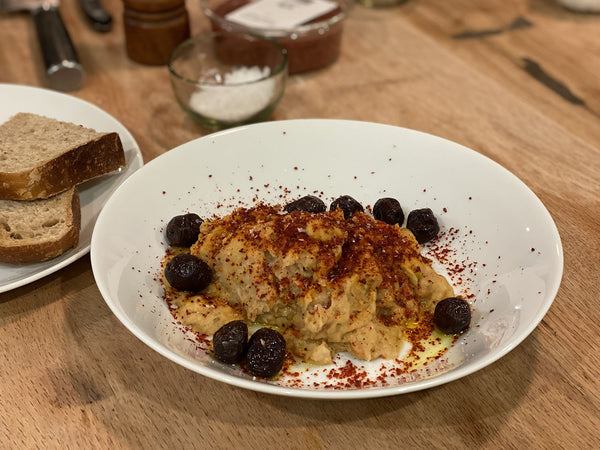
Our household has recently been transformed with the purchase of a pressure cooker, which I now understand is the key to making the most magical beans. The white bean spread below is great at the center of a simple meal like this but also works as an appetizer dip, served with toasts or pita chips. The dip benefits from a punchy, crunchy, acidic component and that is where the carrot pickles come in. And if you’ve never had Aleppo style crushed red pepper, pick some up. It has a tame spiciness, subtle sweetness, and a very full pepper flavor. I’m not sure it has an equal. Pick it up at the Middle East Bakery and Grocery on Foster in Chicago, Illinois.
And folks, please, don’t forget to eat your greens. I grew up in a house where we ate a huge green salad, simply dressed with a vinaigrette, after the main meal, every single night. It is so easy to make, so good for you, and so delicious that there is absolutely no reason (aside from lettuce allergies, of course) not to eat a simple salad every day. Here we call for kale. Of course, use any green you want. We’re now entirely spoiled because we work next to Artesian Farm in New Buffalo, Michigan and have a year-round source of the most tender, delicious curly kale you can imagine. Look them up!
Ingredients
Bread
800 grams bread flour
200 grams whole wheat flour
775 grams water
22 grams salt
Bread Sourdough starter
100 grams bread flour
25 grams rye flour
100 grams water
25 grams unfed starter
Bean spread
454 grams dry northern white beans (1lb bag)
6 cups water
10 grams salt
1 small sized onion
1 medium sized leek
1 red bell pepper
2 tablespoons soy sauce
⅕ bunch of parsley
Aleppo-style crushed red pepper
Olive oil for cooking and dressing
Salt and pepper to taste
Pickled carrots
1 medium carrot
Water
Sherry vinegar
Salt
Salad
100 grams kale
15 grams olive oil
10 grams vinegar
Salt and pepper to taste
Bread (for baking mid-day)
Mix the starter ingredients together at night, between 8 and 10pm. Wet out the ingredients thoroughly in a clean glass container. Make cleanup easy by having two spoons at the ready; one to mix, the other to scrape off sticky starter. Wipe the spoons with a paper towel to avoid getting dough stuck in the sink. Use a plate or a loose fitting cover to close the vessel.
Mix dough in the morning, between 6 and 8am. Combine the flours in a large mixing bowl. Measure water into a medium bowl. Use warm water for a faster bulk ferment and colder water for a longer fermentation. Scrape the starter from the fermentation container and dump it into the water. The starter should be bubbly and appear two to three times larger in volume compared to the night before. Note: If the starter isn’t active you can still bake, just spike your dough with dry active yeast. Put your starter through two to three more feed cycles to build its strength. Pour the water and starter into the flour and mix well with a stout wooden spoon. Let the mixture sit at least 5 minutes before adding the salt and working it into the dough. Cover the dough and let it ferment.
Between noon and 2pm, begin the forming process. Sprinkle a bit of water onto a smooth, non-porous working surface. Turn the dough out with a scraper onto the wetted working surface. With a little water available for your hands and the blade of your bench knife, divide the dough in two.
Work the dough into a round. Scrape under the dough and work at pulling and folding the edges of the dough up onto itself, to make a rough ball shape. Turn each ball shape over so that the folded up seams are on the bottom. Slide your bench knife under the ball, pushing the ball toward your free hand to stretch the outer skin of the dough. You’re essentially tucking the dough under itself, creating tension in the outer skin. At the end of each slide, use your free hand to push the dough off of the bench knife with a tucking motion that further stretches the outer skin of the dough. The sliding motion should elongate the dough, so with each slide, rotate your approach by 90 degrees, sliding the bench knife toward one of the narrow ends of the dough. Do this a dozen or so times until the outer skin appears glossy, smooth, and taught. Try to avoid tearing. Cover the dough with a towel and rest for 45 minutes to an hour.

Uncover the dough and sprinkle flour over the dough and the surrounding work surface. Scrape under the dough from a couple of directions to free it from the work surface and flip the dough, wet side up. Reach under the dough and lightly pull the edges to make a uniform oval or rectangle. Beginning at the end furthest from you, fold a third of the dough up onto itself. Repeat with the opposite end. Reach under the dough and rotate it 90 degrees. Reach under the far end of the dough and roll it toward you. With the seam down, quickly and firmly pinch the ends of the roll closed. Roll the dough over and pinch the bottom seam closed if needed. Try to use only as little flour as is needed to keep the dough from sticking to the work surface as too much flour will make seams harder to close after rolling.
Sprinkle a little flour in an oval banneton. If the outside of the dough is really sticky, roll it in some of the flour on the work surface. Place the dough in the banneton and repeat the process with the second dough. Cover the banneton by placing a lid on top or wrapping a large tea towel around it. Place them in the refrigerator to rest and ferment.
The following day, bake anytime. Preheat your oven and Fourneau Grande baking cloche to 490-500 degrees Fahrenheit for 45 minutes to an hour. If possible, place the cloche to one side of the oven to allow room for a baking tray on the oven rack next to the cloche. Get your hot pads ready, get out the scoring lame, put some water into your steam pitcher, and have the removable tray handle at the ready. Take a banneton out of the refrigerator, uncover or unwrap it, place a fourneau baking tray on top of the banneton and flip the tray and banneton together to remove the dough. Score your dough from end to end with a lame and load the tray into your Fourneau Grande. Pour a tablespoon or so of water into the baking chamber before closing with the hatch. Bake for 20 minutes at 490 with the hatch in place. Remove the tray and place it to the side of the Grande in the open oven. Load your next loaf into the cloche and reset a timer for 20 minutes. When the time is up, remove the first loaf from the oven and allow it to cool. Move the second loaf from the cloche to the open oven and allow it to finish baking for 20 minutes, removing it from the oven to cool at the end of that time.
Fresh bread should be allowed to cool for at least an hour before slicing. It can be eaten fresh or left to sit out on the counter for the rest of the day. After 12-24 hours we recommend storing the remaining bread in a ziplock bag in the refrigerator and refreshing via toasting.
When freezing bread, consider shaving a few minutes from the second stage of baking to produce a less-browned loaf. Allow the bread to cool completely before putting it into a freezer bag and popping into the freezer. Frozen bread can be refreshed in the oven at 325 F for 15-25 minutes with this baking completing the browning process on the crust.
White Bean Spread
Dry beans cooked in a pressure cooker works best but canned beans or boiled beans can be used as a stand in. Soak beans for 1-24 hours. Rinse the beans and add them to the pressure cooker with a whole onion, salt, and about 6 cups of water. Cook on high pressure for 45 minutes.
Meanwhile, slice the leek and dice the bell pepper. In a tablespoon or so of olive oil, cook the leek on low heat until it starts to lightly brown. Add the bell pepper and soy sauce and cook on medium low heat until the peppers are soft.
When the beans are done, drain them and retain the liquid. Allow the beans to cool for a few minutes. Add ⅓ to ½ of the beans to the pan with the cooked leek and pepper. Turn the heat to medium low and cook together for five minutes or so. Combine the contents of the pan with the remaining cooked beans in a bowl and blend with an immersion blender, adding liquid retained from cooking the beans to achieve a spreading consistency. Taste the spread and add salt if needed. Add cracked black pepper to taste. Leave some of the beans whole for texture.
The spread can be enjoyed right away or stored in the refrigerator. It should be warmed to room temperature before serving or served warm. Serve drizzled with your favorite olive oil and garnish with pickled carrots, finely chopped parsley, and Aleppo style crushed red pepper. The pickled carrots add an essential acidity to the dish but they can be replaced with other tangy favorites. Salty, oil-cured olives accompany the bean spread beautifully!
Pickled Carrots
Nothing beats lacto fermented carrots, but quick pickled carrots are a quick to make stand in. Simply slice the carrot into thin slivers or slices, place in a container with a tight fitting lid, and add water to just about cover the carrots. Top off the water with a dash of sherry or red wine vinegar and add salt to taste. The “brine” should be presently vinegary and noticeably salty. This can be left out for the day and used from the fridge for about 3-5 days.
Salad
We get our curly kale from our neighbors, Artesian Farm in New Buffalo, Michigan. It’s hydroponically grown and picked young so the leaves are tender and the stalks are small. It makes a great salad green and will even stand up to sitting dressed if you need to make your “factory lunch” at home in the morning before work. To make the dressing, our olive oil into a mixing bowl, add vinegar, and salt and pepper. Whisk with a fork and taste the dressing, adjusting with a drop of oil if it is too tangy or with a little vinegar if there isn’t enough punch. Prepare the kale by pulling out any large stems, rinsing the leaves in cold water, and spinning them dry in a salad spinner. Add the kale to the vinaigrette and toss until thoroughly dressed, using two clean hands.